Is your Fronius inverter no longer producing data? Let’s get that back for you with the PSW Energy Fronius Inverter WiFi Reconnect guide. The great news is that this is often only ever a minor issue. Chances are the solar energy system is still producing power, you simply can’t see this information being logged anymore through the Fronius Solar.web portal.
Important: this post is pending an update. If you cannot reconnect your Fronius Inverter and are a PSW Energy customer, please contact PSW Life Support in the meantime.
Contents
The following Fronius inverter WiFi reconnect guide is applicable for all Fronius WiFi enabled SnapInverter models that include the Fronius Galvo, Primo, Symo and Hybrid models.
Likely causes
Ask yourself the following questions;
- Was there a blackout or a power outage recently?
- Has the modem been switched off for any reason recently?
- Have you recently changed to the NBN?
- Has the modem been changed or upgraded?
- Has the solar system been switched off recently?
- Has an electrician been working on the property?
If you answered yes to any of the above, there is a high chance your Fronius inverter disconnected from your WiFi network. Your inverter is now trying to communicate through an IP address no longer available from your modem.
It’s important you know the steps to reconnect any WiFi based device as IP addresses will continue to change over the system’s lifetime. Here is how to get your Fronius inverter WiFi reconnected.
Note: If your inverter has disconnected from your WiFi network, this will not affect your solar energy system’s ability to produce energy. It will only prohibit communication to the Fronius Solar.web cloud server, allowing you to view your solar production information.
Required before initiating the sequence
- Physical access to your Fronius inverter.
- A WiFi-enabled device such as a smartphone or tablet.
- Patience, the average reconnection time is 10mins.
Step 1: Activate WiFi Access Point
Stand in front of your Fronius inverter. On the Fronius inverter display, a number displaying the current solar production should be visible, press the BACK button to enter the menu options carousel.
Locate the setup mode by pressing Button 2 , and scrolling to the right until you locate the SETUP menu option.
Reaching the SETUP menu option, press button 4 to ENTER .
Scroll down (button 2) to the WiFi Access Point, and select ENTER (button 4).
A message will appear Activate WiFi AP? Press ENTER (button 4) once again to activate the WiFi access point.
When the WiFi access point has finished loading, it will display the inverter connection details.
Step 2: Connect device WiFi
Once the inverter has activated the WiFi access point, go to your WiFi-enabled device and open up the Settings.
Locate the WiFi settings and select the Fronius Inverter network (FRONIUS_240.#####).
Enter the password displayed on the inverter screen (12345678) and tap join.
Step 3: Access setup assistant.
Once the inverter is connected to your WiFi-enabled device, open up your preferred web browser on the device (chrome, safari, explorer etc).
In the web browser, enter the IP address 192.168.250.181 in the search bar. Locate the settings menu on the right side of the page.
Locate the settings menu on the right side of the page. On the left-hand side of the page, select Network.
Step 4: Network setup
Once the Network setup page has loaded, two columns are displayed Connection mode (left) and WLAN Settings (right).
1. Under the Connection mode column (left) select the Solar.web via WLAN option.
2. Under the WLAN Settings column (right) select the network you would like to connect your Fronius inverter to from the list of available networks.
TIP: Have your network name and password handy.
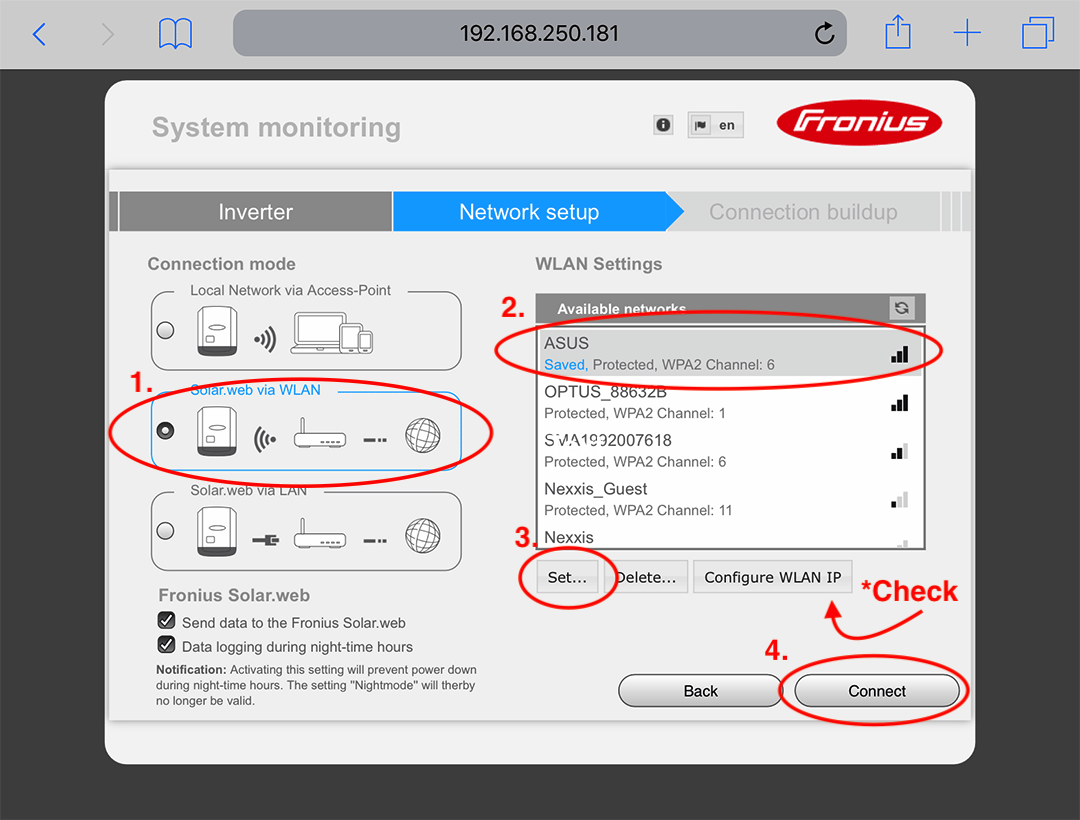
3. Tap the Set… button located on the bottom left-hand corner below the Available networks box. A small box will pop up called WLAN connection. Enter your network password then select Save.
CHECK: When you have successfully saved your network password, select Configure WLAN IP button, and ensure the Get address is set to dynamic (not static), then select OK.
4. Select Connect. A series of connection attempts will cycle with your chosen network. Once connected, a Network status page will display the modem connected to the inverter but No internet connection. In the WiFi settings on the mobile device which you are using, disconnect with the Fronius inverter and resume using an alternative WiFi source.
Log into Fronius Solar.web, and your Fronius inverter should now be reconnected.
Prefer video? Here is the manufacturer-produced video of the Fronius Inverter Wifi Reconnect Guide.
Take your Fronius to the next-level
The Fronius inverter Solar.web platform is good, but why not experience next-level solar monitoring insight?
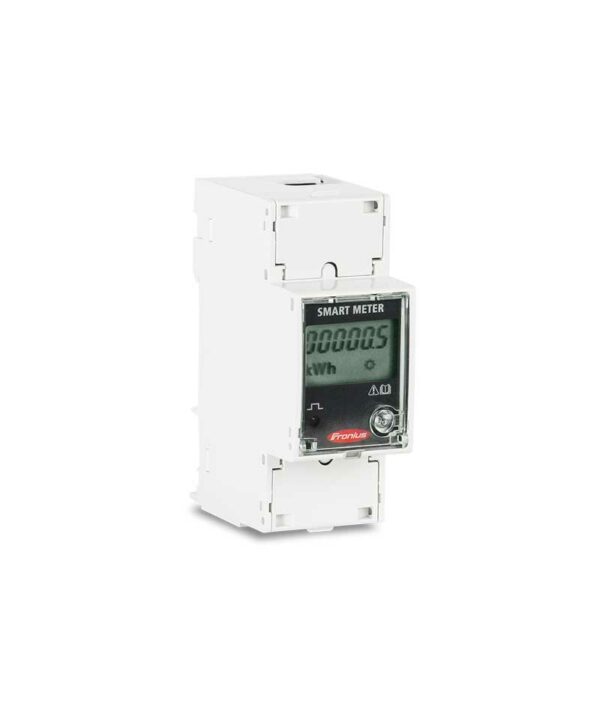
Add a Fronius Smart Meter to view your load profile within the Fronius Solar.web app. View what is currently available in the basic Fronius Solar.web app, plus energy consumption, energy export, true cost savings analysis and more!
Tesla Powerwall 2
$12,490.00 – $14,490.00Fronius Smart Meter
$290.00 – $1,090.00

PSW Energy Technical Support provides this content for PSW Life Support customers. PSW Energy customers seeking further assistance can access personalised support should the Fronius inverter WiFi reconnect issues persist.


3 replies to “Fronius inverter WiFi reconnection assistant”
Adrian Potter
These inverters are very good, but the networking setup is a disgrace! There’s a dip switch which settings is ambiguous at best. Why not just have a menu in the LCD to set up WIFI or Ethernet cable and enter in the address details. I’m a CISCO CCIE and this device would be in the scrap if we had it at work!
Comments are closed.